Buy from the highest-rated provider   Buy SSL.com Certificate x

How to Create a Self Signed Certificate in IIS 7


IIS 7 Self Signed CertificateSSL is an essential part of securing your IIS 7.0 site and creating a self-signed certificate in IIS 7 is much easier to do than in previous versions of IIS. SSL certificates enable the encryption of all traffic sent to and from your IIS web site, preventing others from viewing sensitive information. It uses public key cryptography to establish a secure connection. This means that anything encrypted with a public key (the SSL certificate) can only be decrypted with the private key and vice versa.

When to Use an IIS Self Signed Certificate

Never use a self signed certificate on an e-commerce site or any site that transfers valuable personal information like credit cards, social security numbers, etc.

An SSL certificate has multiple purposes: distributing the public key and, when signed by a trusted third-party, verifying the identity of the server so clients know they aren’t sending their information (encrypted or not) to the wrong person. A self signed certificate is a certificate that is signed by itself rather than a trusted third party. This means you can't verify that you are connecting to the right server because any attacker can create a self signed certificate and launch a man-in-the-middle attack. Because of this, you should almost never use a self signed certificate on a public IIS server that requires anonymous visitors to connect to your site. However, self signed certificates can be appropriate in certain situations:

  • Self signed certificates can be used on an intranet. When clients only have to go through a local intranet to get to the server, there is virtually no chance of a man-in-the-middle attack.
  • Self signed certificates can be used on an IIS development server. There is no need to spend extra cash buying a trusted certificate when you are just developing or testing an application.
  • Self signed certificates can be used on personal sites with few visitors. If you have a small personal site that transfers non-critical information, there is very little incentive for someone to attack the connection.

Just keep in mind that visitors will see a warning in their browsers (like the one below) when connecting to an IIS site that uses a self signed certificate until it is permanently stored in their certificate store. Never use a self signed certificate on an e-commerce site or any site that transfers valuable personal information like credit cards, social security numbers, etc.

Compare Trusted SSL Certificates

Apache Self signed Certificate Error in Firefox

Generate Your IIS Self Signed Certificate

Now you know when to use an IIS self signed certificate and when not to. Now let’s create one:

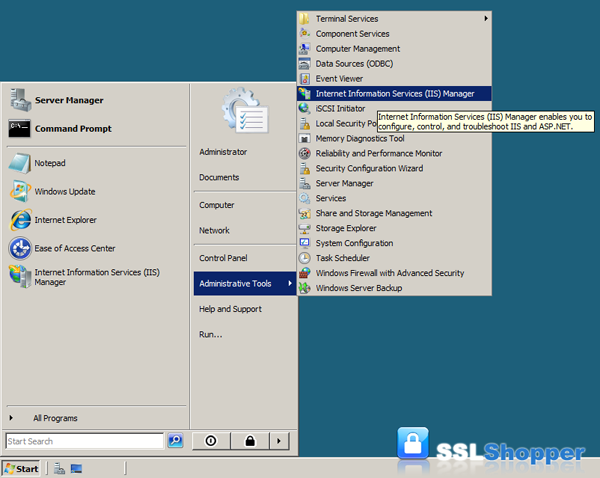
  1. Click on the Start menu, go to Administrative Tools, and click on Internet Information Services (IIS) Manager.

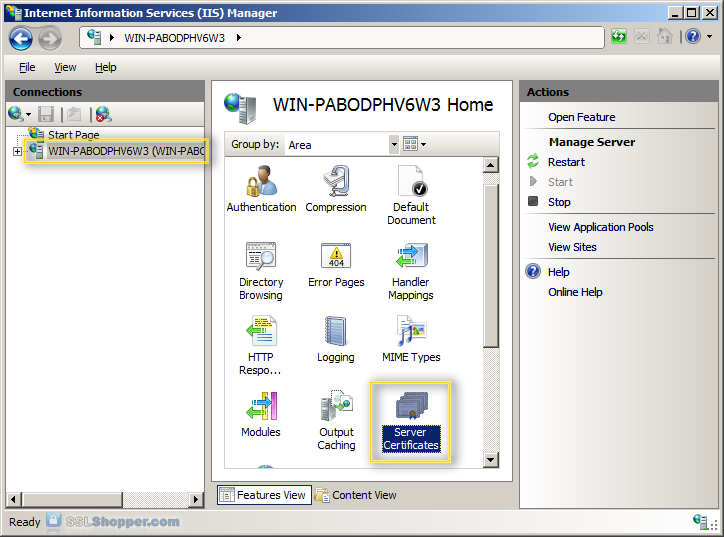
  2. Click on the name of the server in the Connections column on the left. Double-click on Server Certificates.

  3. In the Actions column on the right, click on Create Self-Signed Certificate...

  4. Enter any friendly name and then click OK.

  5. You will now have an IIS Self Signed Certificate valid for 1 year listed under Server Certificates. The certificate common name (Issued To) is the server name. Now we just need to bind the Self signed certificate to the IIS site.

Bind the Self Signed Certificate

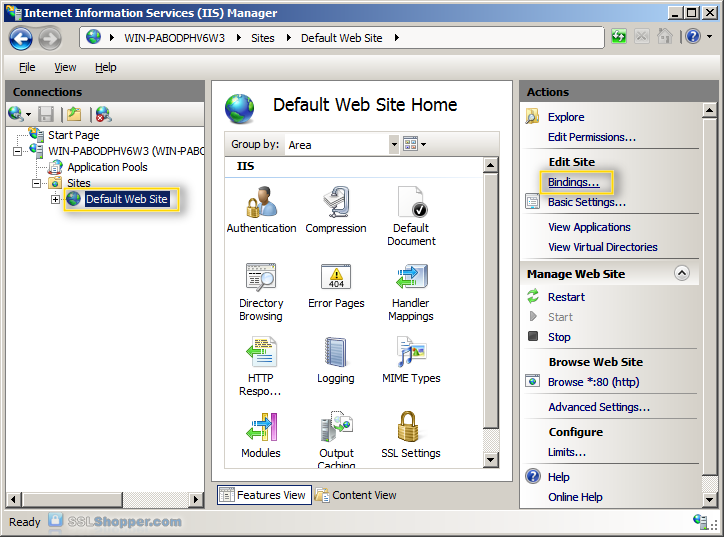
  1. In the Connections column on the left, expand the sites folder and click on the website that you want to bind the certificate to. Click on Bindings...in the right column.

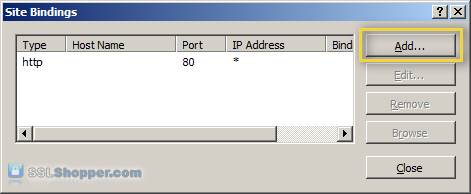
  2. Click on the Add...button.

  3. Change the Type to https and then select the SSL certificate that you just installed. Click OK.

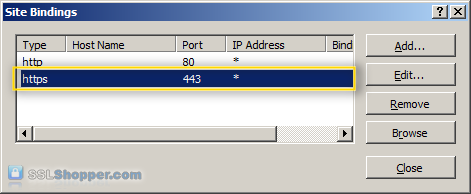
  4. You will now see the binding for port 443 listed. Click Close.

  5. Now let's test the IIS self signed certificate by going to the site with https in our browser (e.g. https://site1.mydomain.com). When you do, you should see the following warning stating that "The security certificate presented by this website was issued for a different website's address" (a name mismatch error).

    This is displayed because IIS always uses the server's name (in this case WIN-PABODPHV6W3) as the common name when it creates a self signed certificate. This typically doesn't match the hostname that you use to access the site in your browser (site1.mydomain.com). For many situations where IIS self signed certificates are used, this isn't a problem. Just click "Continue to this web site" each time. However, if you want to completely get rid of the error messages, you'll need to follow the next two steps below.

Generate a Self Signed Certificate with the Correct Common Name

This step is only required if you want to get rid of the warning message displayed because the common name on the self signed certificate doesn't match the website's hostname. In order to resolve this problem, we'll need to create the self signed certificate using the same method that is used to create a self signed certificate in IIS 6.0 (with SelfSSL instead of through IIS).

  1. Download the Internet Information Services (IIS) 6.0 Resource Kit Tools and install SelfSSL 1.0 (if you do a Custom install you can uncheck everything except for SelfSSL). Once it is installed, click on the Start menu, go to IIS Resources, then SelfSSL, and run SelfSSL.

  2. Paste in the following command and replace site1.mydomain.com with the hostname of your IIS site. If you receive the erorr "Error opening metabase: 0x80040154", just ignore it. We will be manually binding the certificate to the website.
    SelfSSL /N:CN=site1.mydomain.com /V:1000

  3. After the command is finished, you will have an IIS self signed certificate with the correct common name listed in the Server Certificates section of IIS. Now follow the instructions above to bind the certificate to your IIS website.

  4. After you have bound the new certificate to your IIS site, visit it with https in your web browser and you will encounter another error: "The security certificate presented by this website was not issued by a trusted certificate authority." (the SSL Certificate Not Trusted error)

    Don't worry; this is the last error we will need to fix. This is a normal error for self signed certificates because the certificate is signed by itself instead of a trusted SSL provider. All visitors to the site will see that error unless they import the self-signed certificate into their Trusted Root Certification Authorities store (or the appropriate SSL certificate store for the browser they are using). You can easily add the IIS self signed certificate to the store on the server by following the the instructions below. If you need to import the certificate on another Windows machine, just follow the instructions on how to Move or copy an SSL certificate from a Windows server.

Add the Self Signed Certificate to Trusted Root Certificate Authorities

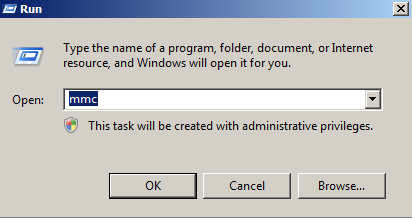
  1. Click on the Start menu and click Run.
  2. Type in mmc and click OK.

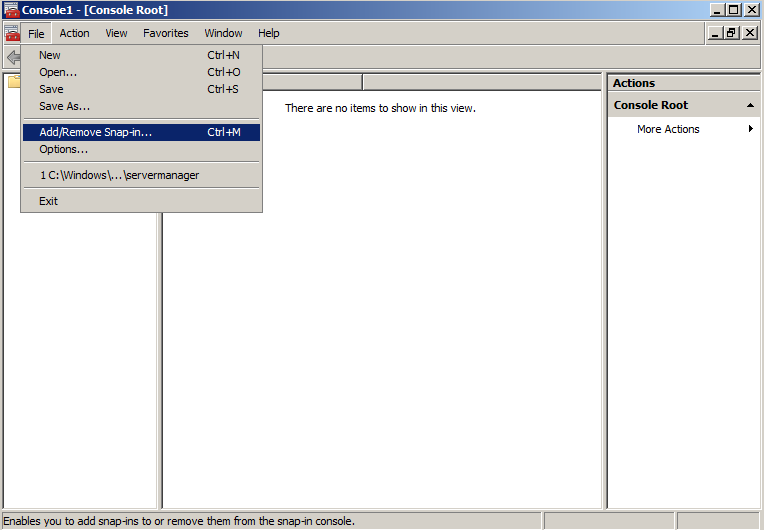
  3. Click on the File menu and click Add/Remove Snap-in...

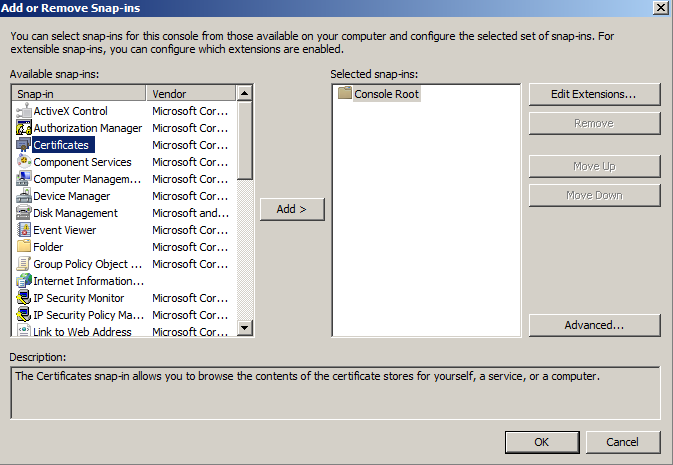
  4. Double-click on Certificates.

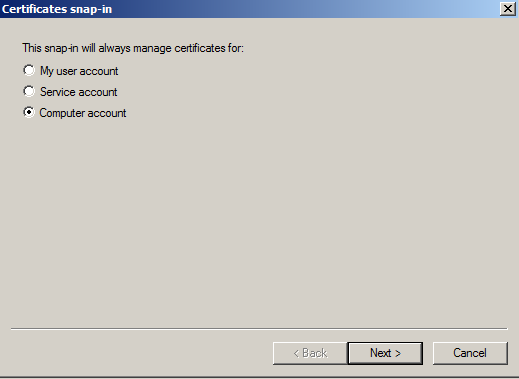
  5. Click on Computer Account and click Next.

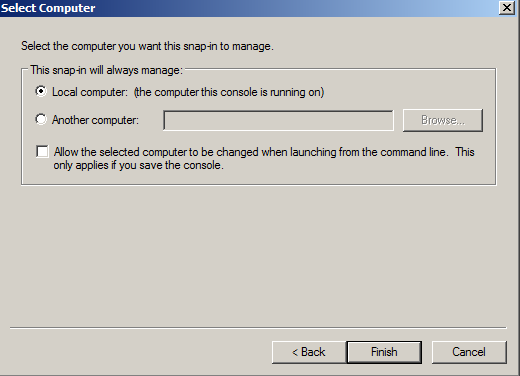
  6. Leave Local Computer selected and click Finish.

  7. Expand the Certificates item on the left and expand the Personal folder. Click on the Certificates folder and right-click on the self signed certificate that you just created and select Copy.

  8. Expand the Trusted Root Certification Authorities folder and click the Certificates folder underneath it. Right-click in the white area below the certificates and click Paste.

  9. Now you can visit your site with https in your web browser and you shouldn't receive any errors because Windows will now automatically trust your IIS self signed certificate.

For more information on generating an IIS self signed certificate, see the following links:

Originally posted on Sat Oct 23, 2010
Comments


Clive Nicholson(2014-12-13)

Well written , accurate and fixed my local issue
Thanks very much!

Anthony Garrett(2014-12-13)

Thanks for putting this together... all the information I needed. I did have to modify it a tiny bit to cope with my site not having the default ID but that's very simple with SelfSSL.

All nicely working with IE, FF, Opera & Chrome (after various approval processes) but still having problems with Safari(Win) failing to recognise the presence of the certificate.

Thanks again.

Eugene Honor(2014-12-13)

simple and direct approach has been provided with this tips.. thanks...

Amy Hsu(2014-12-13)

Spend lots time on it. Really helps. Thanks.

DPK(2014-12-13)

Very comprehensive. Just what I was looking for!

Nelson(2014-12-13)

Just what I was looking for. Thanks!

Mo(2014-12-13)

As far as I can tell, I followed the instructions above to the letter, but when I run the SelfSSL command, nothing changes in my Server Certificates screen. I still have the old certificate with the wrong hostname, and I don't have a certificate with the correct hostname. Also, SelfSSL doesn't give me the "Error opening metabase" warning, but it doesn't complain about anything else, either. After asking me Y/N, it just goes back to the command prompt.

Gordon Shumway(2017-04-05)

You have to run an elevated command prompt.

Mo(2014-12-13)

Also, this comment form is refusing to accept valid email addresses. My standard email address has a "+" in the mailbox name component, so I had to use an alternate.

Nicogis(2014-12-13)

you can use in selfssl.exe the argument /T for add the self-signed certificate to trusted certificates

Robert(2014-12-13)

Thanks, Mo. I fixed the email address validation issue.

Jeff(2014-12-13)

Remember to open cmd with administrator rights, if it's doing nothing more than likely it's because you are not running as administrator. remember even if you're logged in as administrator, you still have to run as administrator.

Ted(2014-12-13)

Thank you!!!

Mithun Kanji(2014-12-13)

Thx mate...The instructions were clear and well written...

Rix(2014-12-13)

I have followed all the steps but clients still get

"The security certificate presented by this website was not issued by a trusted certificate authority."

Clients DID NOT import the self signed certificate, yet because I would like to avoid this. I don't want to force people to follow the bulky certification import steps, I just want them to navigate easily! So my question is: is there a way to allow the self signed certificate to be recognized as valid WITHOUT importing in in the client trusted root store?

Bryan Bowers(2014-12-13)

Hi all, I followed the process (even ran as administrator) but the cert does not show up in the IIS MMC. Any ideas? I get a failed to build the subject name blob: 0x80092023. Would appreciate any help as client is antsy for the fix.

Robert(2014-12-13)

Hi Rix,

Unfortunately, that is the nature of self-signed certificates. Because they are signed by themselves, they can't be trusted until the user actively sets them to be trusted (this is fairly easy in Firefox but more difficult in other browsers). To completely avoid warnings and manual trust process, you'll need to get a certificate from a trusted authority.

poss2446(2014-12-13)

Great directions. I was a bit thwarted on the command line interface but it has done my nuts and bolts objective.

I have extensive experience dancing on someone elses box like a free website account and stuff. This is the fist time of me actually running a true website from my own location. So many thigs to worry about as far as exploits go.

Akshay(2014-12-13)

Not able download "Internet Information Services (IIS) 6.0 Resource Kit Tools" from given link.. Search on google but not able to find the same.
Request you to share new link.

Sanjeev Sagar(2014-12-13)

thanks for this...

sanjeev

SivaKumarReddy M(2014-12-13)

Nice explanation and detailed procedure with screen shots is given. Thanks!

Jeff Quade(2014-12-13)

Wonderful. Works Great!

David(2014-12-13)

Can anyone tell me how to add SANs to a self signed cert using IIS7?

Aaron(2014-12-13)

Great write up, and exactly what I was needing to set this up and do some testing!

Darren(2014-12-13)

Worked exactly as expected.

Viktor Dolezel(2014-12-13)

Great post, thanks.
I was able to bypass the copy-and-paste to Trusted Certificates simply by specifying the /T flag when running SelfSSL.

Mike Caldwell(2014-12-13)

thank you so damn much! I dug for hours and you gave me the few things to get my act together and the server serving my SSL! Thanks again!

IBM(2014-12-13)

Great article. Thanks for sharing..

yurij(2014-12-13)

Youd don't need SelfSSL.
Just use "Crerate DomainCertificate..." link on the right pane.
Enter "sub.yourdomain.com" in the first text box and fill out the others (content doesnt matter).
Click next
Select your own CA server to sign.
Enter some mince display name (or dub.yourdomain.com if you wish)
hit OK
Now you can use it in IIS, export or whatever.

Igor(2018-04-19)

"link on the right hand pain.." where, please?!

Murugan.k(2014-12-13)

Hi sir,

This article is very helpful for me thanks..

Vasilis Saloustros(2014-12-29)

Worked perfectly! Thank you very much!!!

Reza Vosoughi(2015-03-10)

Hello Dear.
After inistalling of iis60rkt when i open SSLSelf.exe it not work. see picture please :
please help me what is problem ?
Thank you.

Bogdan(2015-04-03)

You could install the certificate directly in the Trusted root certificates with SelfSLL using the /T option and directly bind the certificate to a specific web site and port in your IIS using the /S and /P options:

SelfSSL /N:CN=site1.mydomain.com /V:1000 /S:1 /P:443 /T /K:2048

You can find the web site ID to use for the the /S like this:

1. Open the IIS Manager

2. Expanding the Sites forlder from the Connections panel

3. Select the web site for which you want to add the SSL certificate

4. From the Actions panel in the right click on "Advanced Settings..."

5. In the "Advanced Settings" popup you will find the Web site ID in the value for the "ID" property.

Use it for the /S option in the SelfSSL command.

For example, if the ID of your web site is 2, the command should look like this:

SelfSSL /N:CN=site1.mydomain.com /V:1000 /S:2 /P:443 /T /K:2048

Using a key size of 2048 or greater is recommended. This is why you should use the /K:2048 option.

The /P:443 is optional. It used to set the HTTPS port, which, by default is 443. It is useful when you already have a website using the HTTPS 443 port and you want to add the HTTPS binding to another web site.

After you run the command, it will ask you if you want to overwrite the SSL settings for the specified web site (which is 1 by default if you didn't use the /S option). Typing y and pressing ENTER will update the web site. The SSL binding will be visible in IIS after that.

David Doyle(2015-07-23)

After viewing a number
of different sites relating to SSL’s I find it incredible that this tutorial is
so user friendly that even a novice like myself can grasp how to create SSLS’
thanks for such a easy to use guide
Counselling Dublin

Stanleyusa(2015-12-04)

There is no way to select the strength or type of Cert, E.g. SHA-1 or SHA-2???

Saitama Senpai(2016-09-07)

I still get an error "There is a problem with this website’s security certificate."

Xiaoqi Zhao(2017-01-09)

great thanks

Sudhir Gupta(2017-04-21)

is there any way to create self-sign certificate without any third party installation ?
actually i want to developed a batch script where iss will install then certificate will created then apppool and website.xml will be import in new machine.

this all should happen on single click. is it possible ?

Vicki VV(2018-03-22)

Step #1 only works for me if I put my site INSIDE "Default Web Site".

If I try to create a new site (outside of "Default Web Site") none of my .aspx files do anything but say
"Error 404". But all the same files work INSIDE "Default Web Site" though.

Did I miss a step????

Lyas Spiehler(2019-05-02)

It is best practice to use subject alternative names. https://certificatetools.com makes this very simple and generates the OpenSSL commands you can use to do it offline. It supports RSA and ECC keys and multiple subject alternative and common names. You can even use it to make a root certificate authority and sign your web server certificate.

Kevin Cole MCM(2020-01-29)

Note - the link to the iis 6.0 tools has changed to https://www.microsoft.com/e...

SSL Shopper(2020-01-30)

Thanks! I've updated that.

Janice(2020-08-03)

We carefully followed the very long list of steps in "method 1"... only to find out that's *NOT* how to do it.
When we then tried to follow "method 2"... will get a dangerous warning about "you will overwrite this certificate". Is it safe to do so?

Can't we just START at method #2 instead? What is "method #1" for? To show everyone what *NOT* to do???

Aleksandr Filatov(2021-01-11)

Please find the full description for Win/OSX in my blog post https://alfilatov.com/posts...

Advertisement • Hide